
Getting Started with OneSite Patch
This guide provides new and seasoned administrators with conceptual descriptions, reference details, and tasks designed to enhance the administrator experience with the OneSite Patch product. You can learn all the basics here and find some of the many resources available to you to learn even more.
Prerequisites
Before using OneSite Patch, you must set up your OneSite environment. See the Adaptiva OneSite Installation Guide for details.
The Adaptiva Server software installation includes all OneSite products. After you add license keys for your licensed products, you are ready to access the
power of OneSite in your environment.
Key Topics
The OneSite Admin Portal
Adding license keys
Supported Browsers
OneSite Patch supports Google Chrome and Microsoft Edge.
Customer Support
Whenever you need information beyond what the Documentation and our Knowledge Base provide, enter a support ticket and request help from Adaptiva Customer Support.
Adaptiva OneSite Admin Portal
OneSite Patch uses the Adaptiva OneSite Admin Portal and the OneSite Patch Dashboard Portal to configure and manage the product. The Adaptiva Workbench also provides useful administrative details.
All Adaptiva products use the Adaptiva Admin Portal (Admin Portal) to set up the Adaptiva environment, create policies, add administrators, and more.
Settings created here are global settings and support all licensed Adaptiva products. See.
Key Topics
Log in to the Onsite Admin Portal
Add license keys
Login to the OneSite Admin Portal
During the OneSite installation, the administrator creates a SuperAdmin account using either a native OneSite login or a Windows Active Directory account.
Enter the Fully Qualified Domain Name (FQDN) for the AdaptivaServer service followed by the port (optional) into the browser address bar:
http://<FullyQualifiedDomainName>:[port]
Confirm the port with the OneSite administrator. If the server is already using port 80, for example, the web site might use port 9678.
Press Enter. The OneSite Admin Portal login dialog opens.
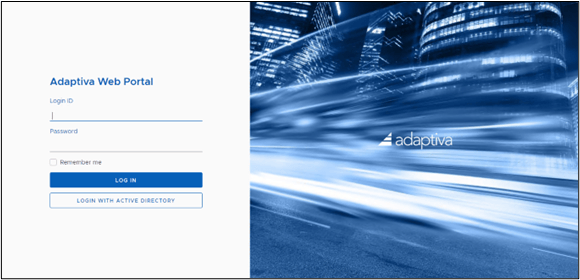
Enter your Login ID and Password based on your log in choices:
- Enter the login information for your current session, and then click login with active directory. Credentials do not have to be an Active Directory account.
- Enter the Login ID (e-mail address) and password provided by the OneSite administrator, and then click log in.
- After a successful login, the OneSite Admin Portal dashboard appears.
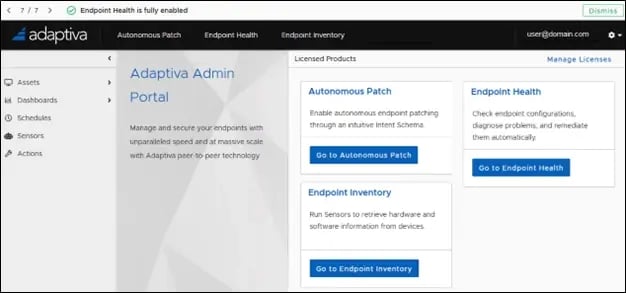
Adaptiva OneSite Patch Dashboard
Use the OneSite Patch Dashboard, which is available from the Web Admin Portal, to manage your patching strategies, review patching status, and more.
Key Topics
Touring the AdaptivaOneSite Admin Portal Dashboard
Access the OneSite Patch Home Dashboard
Access the OneSite Patch Dashboard
- Login to the OneSite Admin Portal if you have not already done so.
- Go to OneSite Patch using one of the following methods:
- Click Autonomous Patch near the top of the page.
- Click Go to Autonomous Patch from the Licensed Product page.
Key Topics
Touring the OneSite patch Home dashboard
Quick Start Introduction to Patching Strategies
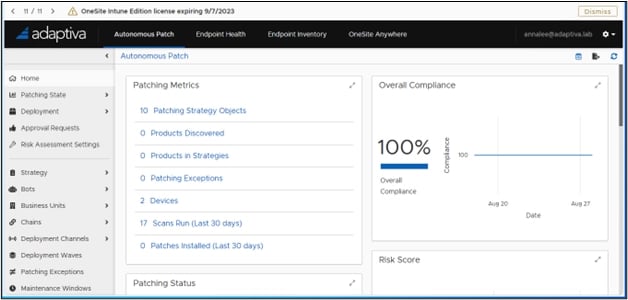
Quick Start Introduction to Patching Strategies
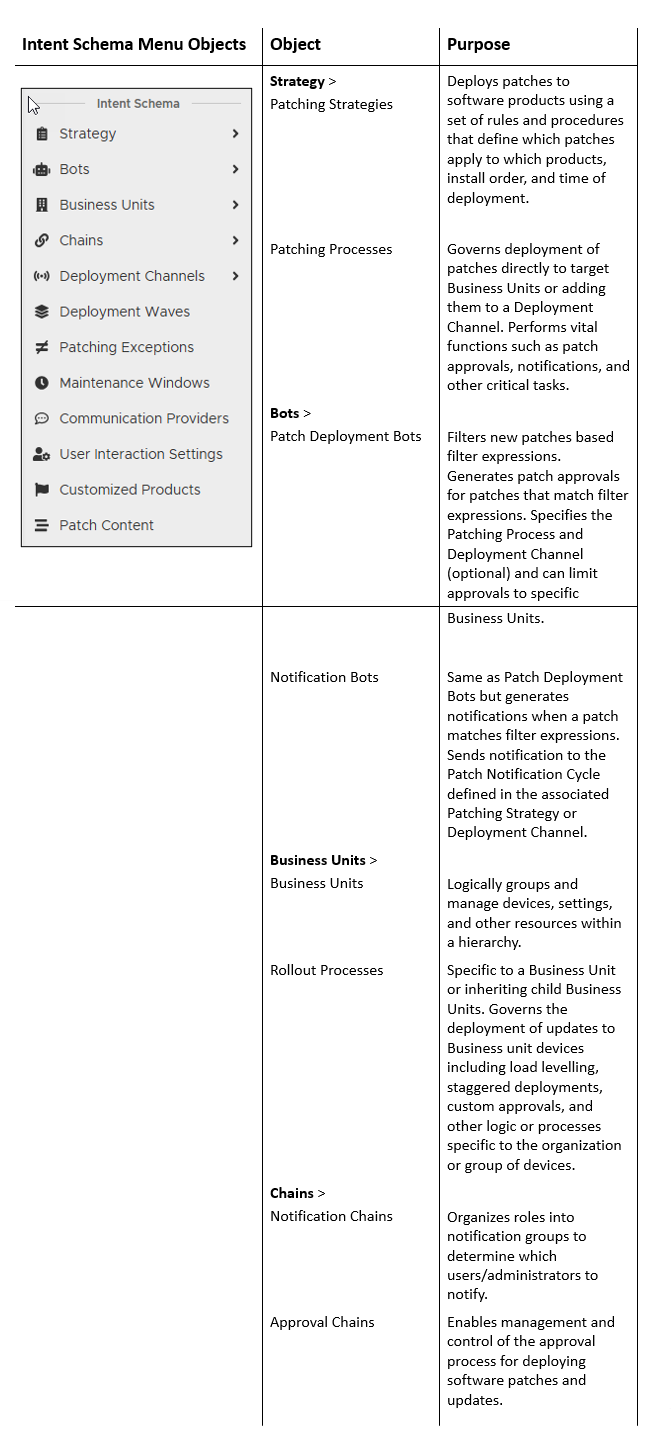
The OneSite Patch menu in the left pane of the Patch dashboard lists the Intent Schema objects available for meeting your Patching Strategy requirements.
When you have multiple Patching Strategies, some or all objects come together to define requirements and deploy patches accordingly.
Key Topics
Quick Start Patching Strategy
Patching Strategies in Depth
OneSite Patch Left Navigation Menus
Create a Patching Strategy
Use Case
An administrator wants to build a Patching Strategy to update devices every day based on the following specifics:
- Devices that are:
- Companywide (all Clients).
- Running a version of Google Chrome Enterprise other than the internally approved version.
- Immediate, mandatory update to approved version.
- No approval needed.
The IT team chose 9:00 a.m. daily for the update because most users log on to the network and use their device during business hours.
Create a New Folder
- Mouse over Strategy or click the right arrow next to Strategy in the Autonomous Patch Dashboard.
- Create a new folder to hold all the Adaptiva Patching Strategy folders:
- Click the ellipses(…) to the right of the Patching Strategies Folder, and then select New Folder.
- Enter Adaptiva Patching Strategies as the folder name, and then click Save at the bottom left.
- Move each of the existing Adaptiva folders to the new folder:
- Drag and drop the folder to the newly created folder. This opens the Move Objects dialog.
- Click OK.
- Repeat steps a through c for each Adaptiva folder (Initial Patch Manager Approval, No Approval, Phased Patch Manager Approval).
- Repeat Step 3a to create a new folder for your own strategies. Be sure to Save As whenever you need to use an Adaptiva template, and then move your template to your own folder.
- Choose a Patching Strategy.
Choose a Patching Strategy
This Patching Strategy deploys at once (based on schedule) and does not require any approvals or user interaction. Between deployments, if the OneSite Patch scan finds no devices that are out of compliance, the strategy does not deploy.
- Mouse over Strategy or click the right arrow next to Strategy in the left navigation menu on the Autonomous Patch Dashboard.
- Select Patching Strategies.
- Click the No Approval folder in Adaptiva Patching Strategies. This populates the No Approval table in the right pane with the available workflow templates.
- Click Initial Approval - Immediate Mandatory Deployment to open the template.
- Click More in the upper left corner of the template, and then select Save Patching Strategy As:
- Enter a unique name that reflects what the strategy does conceptually. For example, ITS Immediate Daily Product Patching.
- Click OK. This opens your strategy template with all the default entries for the built-in strategy, including a detailed description.
- Scroll down to Deployment Settings.
Configure Deployment Settings
Deployment Settings for quick start purposes include selecting a built-in Deployment Wave, which already includes a Business Unit. For details on Deployment Waves, see Deployment Waves.
- Choose a Patching Strategy, if you have not already done so.
- Click Browse next to Add Deployment Wave in the Deployment Settings box.
- Click the box next to Single Wave – All Clients to select it, and then click Add Deployment Wave at the bottom left.
- This Deployment Wave includes a business unit called All Clients Business Unit.
- All patches that meet the Deployment Bot filtering requirements for this Business Unit will receive the software products you select later as part of this strategy.
- Review the table to the right of the Patching Process Settings:
- For quick start purposes, leave the default schedule setting as Daily(11 hours). This schedule will run at 11:00 am local time (default).
- To change defaults or learn more about scheduling, see Schedules.
- To learn more about Patching Process Settings see Patching Processes.
- Scroll down to Patch Deployment Bots:
- Every Patching Strategy needs a Deployment Bot, which filters patches by specified criteria..
- For quick start purposes, leave the default Deployment Bot as Unfiltered – Immediate Deployment (No Approval) – Mandatory Install.
- To change it later or learn more about Deployment Bots, see Bots – Patch Deployment and Notification Bots.
- Scroll up to Products.
Add Software Products
For quick start purposes, we will add one product. To learn more about adding products, see Software Products Library.
- Configure Deployment Settings if you have not already done so.
- Click + Add Software Products in the Products box.
- Click the Down Arrow next to Search Columns and verify that the only box checked is next to Name. Uncheck any other boxes.
- Enter Chrome on the search line, and then click Search.
- Click the check box next to Google Chrome x64 to select it, and then click Add Software Products at the bottom left of the page.
- Scroll up to General Settings to enable the strategy.
Enable the Patching Strategy
Enable the Patching Strategy after you have completed the Patching Strategy configuration. Once enabled, the strategy will run according to the configured schedules.
- Add Software Products if you have not already done so.
- Click the button to the right of Strategy Enabled to enable (blue) the strategy.
- Click Save at the upper left of the workflow.
View the Staged Patching Strategy
- Create a Patching Strategy if you have not already done so.
- Click the right arrow next to Deployment in the upper section of the navigation menu, and then select Patching Cycles. The strategy just created appears in the Total Running Patch Processes box.
- Click the strategy name to view cycle information.
- If you add a new Client to your network before this strategy runs, when OneSite Patch initiates the next scan and detects an earlier version of Chrome, OneSite Patch adds that computer to this strategy automatically.
Adding Optional Objects to Patching Strategies
Minimum requirements for a Patching Strategy are described in the Quick Start Introduction to Patching Strategies. OneSite Patch includes other objects you can add to further customize and control your Patching Strategies.
For information about each of these, as well as information for using them as part of a strategy, see each of the sections listed below. This list appears in the order the items appear in the Intent Schema menu in the left pane:
- Strategy
- Bots – Patch Deployment and Notification Bots
- Business Units and Rollout Processes
- Chains - Notification Chains and Approval Chains
- Deployment Channels and Channel Processes
- Deployment Waves
- Patching Exceptions
- Maintenance Windows
- Communication Providers
- User Interaction Settings
- Customized Products
- Patch Content
Content Prestaging Settings
The following templates use Content Prestaging Settings:
- Patching Strategies
- Business Units
- Deployment Channels
To understand and create Content Prestaging Settings, see Content Prestaging Settings.
Patching Strategies
Patching Strategies are the central management objects in OneSite Patch because they group the details that define how, when, and where to patch third-party products. OneSite Patch includes prepopulated templates that address most patching scenarios. You can save these templates using your own titles and descriptions, and then customize them to your environment.
CAUTION: Do not add Windows products to any strategy or enable Include All Products before consulting with Adaptiva Support. Enter a ticket on the Adaptiva Support Portal to engage an Adaptiva Support Engineer.
Purpose of a Patching Strategy
Each Patching Strategy uses building blocks that can include Schedules, notifications (Chains), Deployment Channels, Bots, and Business Units to define a given patching scenario. At minimum, a Patching Strategy must include a Deployment Wave and a Bot.
Functionally, a Patch Strategy performs the following:
| Automated handling of new patches | Automatically discovers new patches and uses the Deployment Bot to match new patches to the Patching Strategy. The Strategy invokes the Deployment Channel, which uses its Deployment Bot to filter the new patches and identify which ones to deploy. The Patching Process queues patches for processing and, according to the set schedule, activates patch deployment in groups to minimize the impact on endpoints and end users. |
| Customized targeting of patches | Administrators can target specific products and high profile patches that trigger a Deployment Bot based on individual products. This is particularly useful when you first install OneSite Patch and have a considerable number of products that require patching, and you prefer not to patch these automatically at first. |
| Reuse Intent Schema Objects | All objects in OneSite Patch are interoperable and designed for use in any Patching Strategy. Create a patching process, schedule, notification or approval chain, or deployment process once, and then use them in various Patching Strategies depending on your needs. |
Patching Strategy Template Naming Conventions
OneSite Patch Patching Strategy templates cater to four specific use cases: Approval Types, Rollout Urgency, Rollout Phasing, and User Interaction. By offering various combinations of these parameters, the templates are a versatile framework that can accommodate a wide range of patching scenarios.
The OneSite Patch Patching Strategy templates include a Deployment Wave that has a designated Deployment Bot, satisfying the minimum requirements for a Patching Strategy.
Minimal customization includes adding the products to patch and a schedule. This flexibility allows for efficient patch management without the need for extensive customization or the creation of new strategies.
When deciding which Patching Strategy to choose, consider the following use cases:

Table 1: Strategy Considerations
| Approval Type1 | Rollout Scheduling2 | User Interaction3 | Rollout Phasing4 |
|---|---|---|---|
| No Approval: Deploys at once. Initial Approval: Requires approval prior to deploying. Phased Approval: Requires approval between each wave in the Deployment Waves object. |
Immediate: All product patches deploy at once. Risk Based: Targeted and controlled deployment based on specific risk levels (low, medium, high, critical). Schedule and run patch deployments based on risk levels. Uses Deployment Channels5. |
Mandatory: Alerts the end user who can postpone depending on
Interaction Settings but cannot not decline. Optional: Alerts the end user. Otherwise, functionality not available in this release. |
Phased: Non-Phased: |
1Level of approval needed prior to deployment.
2Defines the schedule and impact of a deployment.
3Defines permitted user actions related to the patch installation.
4Defines whether to deploy in a phased manner (better control and issue detection), or to deploy in a non-phased manner (faster deployment).
Patching Strategy Templates
Effective management and deployment of software patches is crucial for maintaining the security and stability of an IT infrastructure. The included Patching Strategies address various deployment scenarios and considerations.
Recommended Use
You can choose a Patching Strategy template, save it under a descriptive local naming convention, and then customize it as needed. OneSite templates include a Deployment Wave, which contains a Deployment Bot. These are the minimum requirements for a successful patching strategy.
Adaptiva recommends creating a folder to hold all the provided patching strategies. This separates them from any new strategies you create, which you can save under Patching Strategies or create your own filing system for organizing your Patching Strategies (see Create an Adaptiva Patching Strategies Folder).
View built-in Patching Strategies
These built-in strategies are often enough to get an organization started with a basic patch protocol. To build a Patching Strategy using an Adaptiva template, see Create a Quick Start Patching Strategy.
- Go to the Autonomous Patch Dashboard.
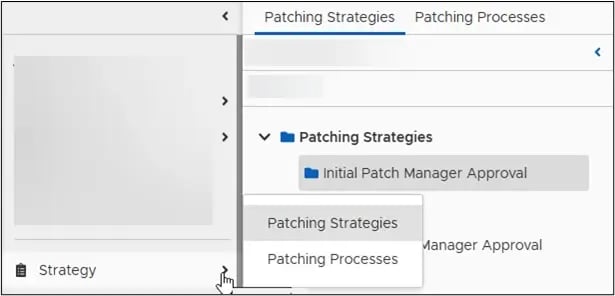
- Mouse over or click the right-arrow next to Strategy in the left pane, and then select Patching Strategies.
- Click any Patching Strategy to see the deployment workflows associated with that strategy.
- Create an Adaptiva Patching Strategies Folder, if you have not already done so.
- Create a Quick Start Patching Strategy.
Initial Patch Manager Approval Strategies
Each of these strategies requires an approval step before deploying updates. Except for Risk Based Mandatory Deployment, the Patching Process within these strategies manages the deployment process exclusively and does not use Deployment Channels.
Similarly, the Deployment Bot does not apply any filtering mechanism, so the Patching Process manages all updates related to the products included in the non-risk strategies.
Initial Approval - Immediate Mandatory Deployment
Approval required prior to deployment, then deploys at once with no user interaction.
Initial Approval - Immediate Mandatory Phased Deployment
Approval required prior to deployment, then deploys at once in a phased manner, rolling out to each wave of business units sequentially with no user interaction control.
Initial Approval - Immediate Optional Deployment
Approval required prior to deployment, then deploys at once in a phased manner, rolling out to each wave of business units sequentially. User interaction allowed.
Initial Approval - Risk-Based Mandatory Deployment
Approval required prior to deployment, then deploys at once to all devices in the targeted business units based on the patch risk levels.
Uses both Deployment Waves and Deployment Channels. Higher-risk updates have priority in high-frequency Deployment Channels. Lower-risk updates belong to lower-frequency Channels.
Also uses Deployment Bot to filter patches based on risk level, and then sends the final wave to the proper Deployment Channels.
Ensures processing and deployment of the final wave through the most suitable Deployment Channel and adds a layer of control and customization to the deployment process.
No Approval Strategies
Each of these strategies requires no approval before deploying updates. Except for Risk Based Mandatory Deployment, the Patching Process within these strategies manages the deployment process exclusively and they do not use Deployment Channels.
Additionally, the Deployment Bot does not apply any filtering mechanism, so the Patching Process manages all updates related to the products included in the non-risk strategies.
No Approval - Immediate Mandatory Deployment
No approval needed prior to deployment. Deploys at once with no user interaction.
No Approval - Immediate Mandatory Phased Deployment
No approval needed prior to deployment. Deploys at once in a phased manner, rolling out to each wave of Business Units sequentially. No user interaction.
No Approval - Immediate Optional Deployment
No approval needed prior to deployment. Deploys at once to all devices in the targeted business unit. User interaction allowed.
No Approval - Risk-Based Mandatory Deployment
No approval needed prior to deployment. Deploys at once to all devices in the targeted business units based on the patch risk levels. No user interaction.
Uses both Deployment Waves and Deployment Channels. Higher-risk updates have priority in high-frequency Deployment Channels. Lower-risk updates belong to lower-frequency Channels.
Also uses Deployment Bot to filter patches based on risk level, and then sends the final wave to the proper Deployment Channels.
Ensures processing and deployment of the final wave through the most suitable Deployment Channel and adds a layer of control and customization to the deployment process.
Phase Approval Strategies
Each of these strategies requires phased approvals before deploying updates. Except for Risk Based Mandatory Deployment, the Patching Process within these strategies manages the deployment process exclusively and they do not use Deployment Channels.
Similarly, the Deployment Bot does not apply any filtering mechanism, so the Patching Process manages all updates related to the products included in the non-risk strategies.
Phase Approval - Immediate Mandatory Phased Deployment
Approval required between each wave of the deployment, and then deploys the updates in a phased manner, rolling out to each wave of business units sequentially. No user interaction.
Phase Approval - Risk-Based Mandatory Deployment
Approval step required between each wave of the deployment, and then deploys the updates at once to all devices in the targeted business units based on risk levels. No user interaction.
Choose a Patching Strategy